Showing posts with label video. Show all posts

Friday, August 10, 2018

Running With Scissors, Patterns by Annie


I used one of Annie Unrein's (Patterns by Annie) newest patterns:
Running With Scissors to sew this useful case.
The name of the pattern itself is clever,
but the assembly instructions for this one
are some of the most clever from any of the Patterns by Annie.


I started by quilting my main fabric, Soft and Stable,
and lining fabric together using my Block Rockit quilting machine.
BTW, I have my 14" Block Rockit on a 5 foot frame.
In my opinion, that is the perfect set up for a bag maker such as myself.
The cotton quilting fabric that I use is 44/45 inches wide,
which fits perfect on the 5 foot frame.
Also, I don't ordinarily quilt large quilts, just lap size,
so my set up stays this way all the time.
I prefer to quilt my fabrics and soft and stable all in one large piece
because cutting of all the components of the bag goes very quickly
after the fabric is all quilted.
Patterns by Annie usually follow a general set of steps.
In case you missed it, click here for my blog post on those steps.
There is an updated method of sewing the handle and "spine" support for this pattern.
It is different from other By Annie patterns that I have sewn in the past.
I really, really like the new method.
It helps keeps the top of the bag from bowing when it is filled with your supplies.
Speaking of supplies, you can fit a plethora of sewing supplies
(or whatever type of supplies you plan to carry) in this handy case.
The interior of the spine features fold-over elastic bands to hold items such as spools of thread.
And there are numerous slots and zippered pockets (vinyl, mesh, and quilted fabric).


Another plus about this pattern, is that the construction is done flat.  

← Interior

Exterior→

The zipper does not go in until the interior and exterior have been completed.


After the zipper and zipper tab are done,
the binding is added and that is the last step.

Here is what I have to say about the zipper and tab:
1.  After inserting the zipper, cut it the length instructed in the pattern,
then, if it is too long for your taste, cut a little off at a time until it is the length you wish
(for my personal taste, this zipper tail is too long, so I plan to cut it down by about half).
2.  Add a metal zipper end for a more professional touch:
Gather your zipper end supplies and mark the length of your zipper

Cut the zipper along your marked line (DO NOT use your good fabric scissors)

Roll the sides of the zipper toward the center on the wrong side of the zipper

Use a dab of glue for added security
(my favorite is Guterman HT2, available on Amazon)

Push the zipper down into the zipper end as far as it will go
and allow the glue to set for about 30 minutes

Add the teeny, tiny little screw that comes with the zipper cord end,
and tighten it down with a teeny, tiny screwdriver

Here's what it looks like on the top side

In case you haven't had enough of my ramblings,
here's a video to give you a closer look at my tool case:

Thank you so much for reading my blog.
Have a terrific time sewing your own tool case.


Thursday, June 28, 2018

Katie Cupcake Cheerio Wallet Pattern

I've really put my Necessary Clutch Wallet through the paces,
so I decided it was time for a new wallet.
Whilst I love my NCW, I also really enjoy trying new patterns.
So I decided on the Cheerio wallet pattern this time around:
I did alter the flap pattern piece so I could use the metal edge trim from Emmaline Bags.

The lining is one big, long piece.
Be certain to mark all the lines as indicated on the pattern.
Beginning with the bottom of the lining,
self-made (or purchased) binding is attached at the first line
(with the lining wrong sides together folded at the line).
Then the binding edge is folded up to the next line, etc.

It's kind of like fabric origami.
If you are new to zipper insertion,
or just timid about giving it a try -
no worries.
The pattern walks your through a very simple zipper insertion method.
I used an ivory By Annie handbag zipper and a lipstick color zipper pull.
I love having the option to customize my zippers.
I used By Annie Soft and Stable instead of the fusible fleece as suggested in the pattern instructions.


The Soft and Stable is a bit thicker than the fleece, so I added a stitched line to serve as my
"score" line so the wallet would fold nicely.
I chose to add an embroidered monogram to the front flap because the Blush linen 
just asked for some kind of embellishment.

The one step that I did not change, but that I would change on a future wallet,
is that I would insert a piece of Timtex the full size of the flap, rather than just a 2 x 2
piece as called for in the pattern instructions (see how the outline of the Timtex shows
through the fabric underneath the snap).

The fabrics I used for this wallet are:

English Roses by Penny Rose Fabrics for Riley Blake Designs


All in all, this is a quick and easy wallet pattern.
If you are in the market for a new summer sew,
this one would not take up much of your summer sunshine!

Happy Summer Sewing, friends!
Thank you for reading my blog.


Wednesday, May 23, 2018

New Products

Hello Sewers!
I have exciting news.
I am adding items to my shop from none other than Riley Blake Designs.
I'm so excited to be able to add fabric choices to complement
the great pattern and hardware selections that I currently carry.

I'm curious to know how you select your fabric for your
handbags, totes, and accessory projects.
Please leave a comment below, or contact me via email.
I want to supply products that 'baggers' want.

A huge benefit to living near Christensen Wholesale is that I can shop
in person for great items to offer my customers.

To see some of the new items that I am adding,
click on the video below:

I look forward to hearing from you.
Thanks so much for reading my blog.
Don't forget to leave a comment below.

Thursday, May 17, 2018

The Gabby Handbag


Here is a look at my newest handbag.
I used the Gabby Bag sewing pattern from #emmalinebags
There is also a closer look video at the end of this post.


The main fabric is cotton/linen canvas from #cottonandsteel
For the accent portion at the top of the bag, I used an upholstery fabric sample.
My friend, Kim, gave me a stack of samples that were used by a sales rep.
They are not large samples, but they are perfect for bag accents.
Thanks, Kim!
The bag lining is quilting cotton.
There is a slip pocket on one side of the interior.
I used the fly stitch to add strength to the top of the pocket openings.
The other side of the interior has a zipper pocket.
There is lots of room inside this great handbag,
but don't get me wrong,
it is no means the size of a large tote.
There is a time and a place for a tote,
but there is also a need for a handy,
everyday size purse,
and that's what the Gabby Bag is!
There is also a zipper pocket on the outside of the purse.
I love how the lining fabric accents the zipper opening.
The clever gusset on each end is a nice detail.
The way the side tapers up to the top is so attractive.
The pattern includes instructions for fabric handle tabs and zipper ends,
but I chose to use hardware in antique brass.
The hardware adds a professional finish to this handmade beauty.
I can see myself sewing up another one of these handbags this fall.
I love the pattern and the instructions are clear and easy to follow.
The difficulty rating is intermediate, but I think a confident beginner could sew this one.

Who doesn't need another handbag in their wardrobe?


Monday, April 16, 2018

Round Trip Duffle Bag

If you, or somebody you know, needs a BIG duffle
this is the pattern for you!

It is the Round Trip Duffle pattern from Patterns by Annie.

The finished measurements are 12"H x 19.5"W x 7.5"D

The pattern suggests quilting your main fabric, Soft and Stable, and lining fabric
together on a long arm (if you have access to one) before you cut your pattern pieces.

I used a groovy board and quilted mine with my Block Rockit.


When you cut your pattern pieces, be certain to use the little labels that are included.
They help keep all your pattern pieces identified
and they will make your sewing life sew much easier!

There is a nice size slip pocket at each end of the duffle.
That's also where you will add a triangle ring or a D-ring and a swivel snap hook
to attach your shoulder strap.


The shoulder strap also features a slider so you can adjust the length according
to your needs.  To protect your shoulder, the metal slider slips into the
comfortable, padded cover that is part of your shoulder strap.
You also have the option of using the handy carry straps that are attached to each
side of the duffle using rectangle rings.
And when you need to be hands and shoulder free,
you can secure your duffle to your rolling luggage with the handy trolley sleeve
that is sewn to one side of the duffle.


There is a large mesh zipper pocket on one side of the interior,
and handy slip pockets on the opposite side of the interior.
The bottom of the bag is supported by a piece of acrylic, cut to size, that is covered
with a sleeve (an acrylic support pillow case, if you will).
To help keep the bottom exterior of my duffle clean and to help reduce wear,
I added four feet to the underside.
The pattern does not give instructions to do this,
but that is how I prefer to finish a bag this size.
It is easy to add this step, but be certain to do it before
attaching the bottom of the bag to the sides of the bag:
On the exterior of the bag bottom,
mark the desired location of your bag feet (I used four)
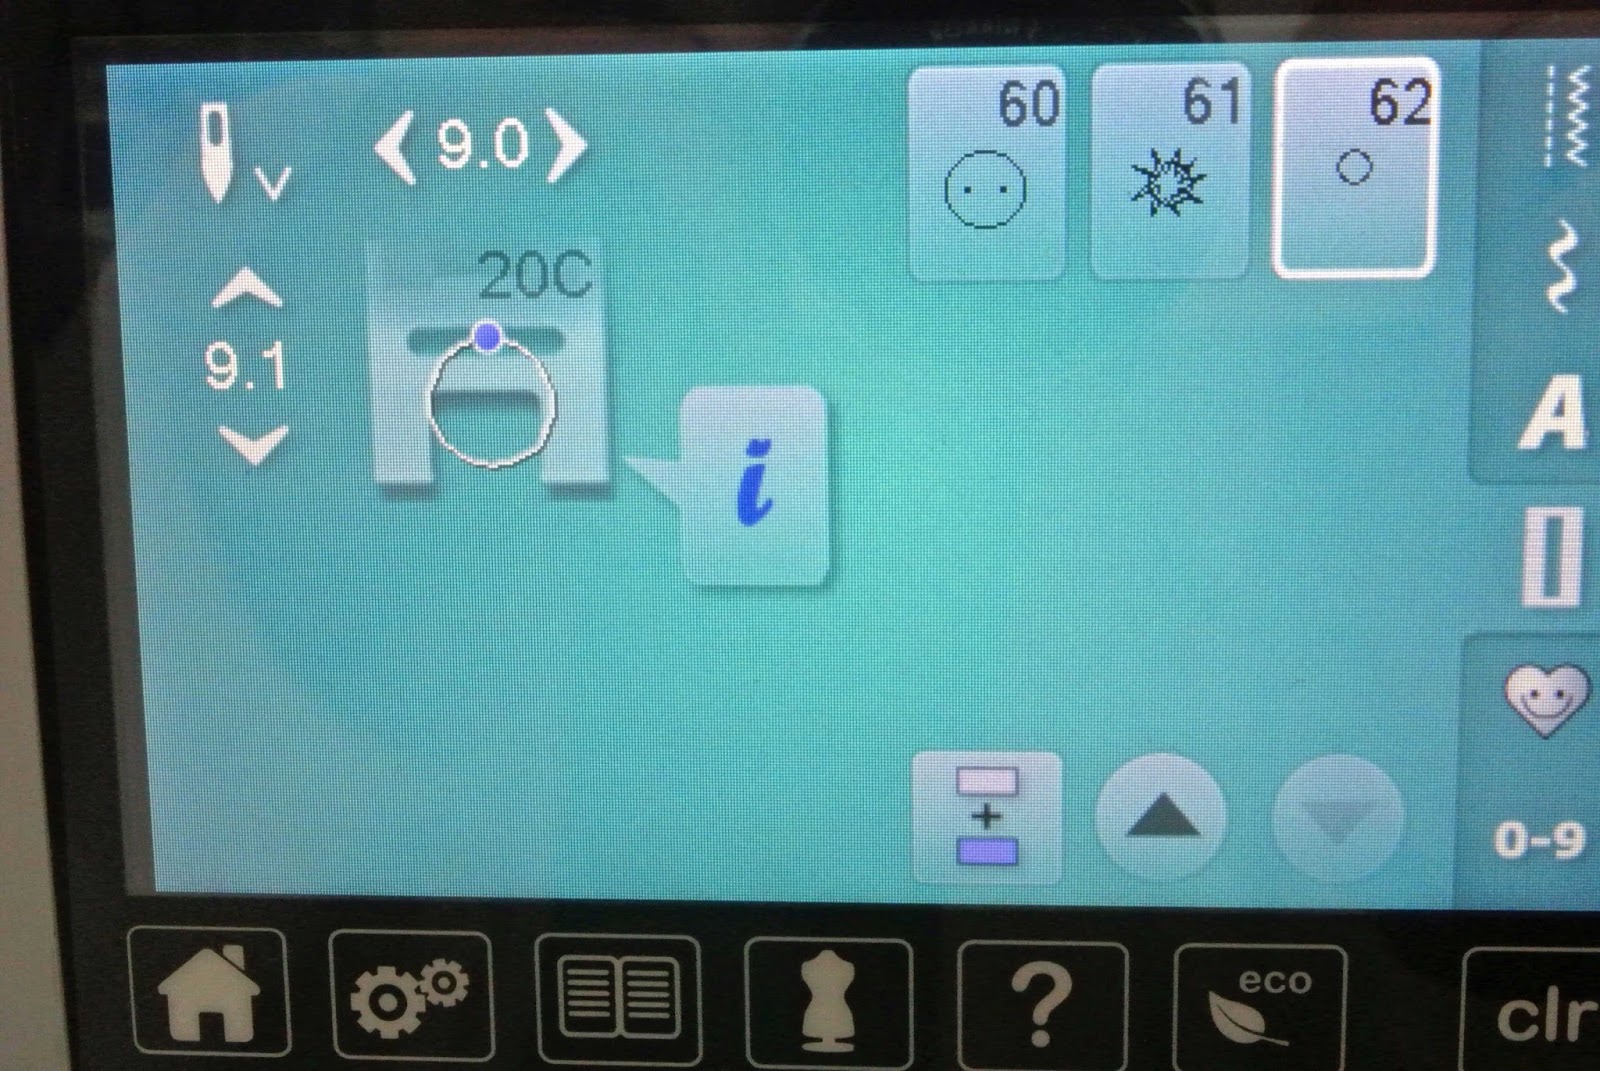
If your machine has an eyelet stitch, that's the one to use for this technique.
It looks like the above stitch #62 on my Bernina.
If your sewing machine doesn't have this stitch, that's okay!
Simply draw circles (approx. 1/4" to 3/8" circumference) on the exterior bottom of your bag.
Then use a small zig zag stitch or a triple straight stitch to sew around your marked circles.
Now it's time to clip the circle open.
The easiest way to do this is to fold the bag bottom in half right through the middle of the eyelet,
snip it open with the tip of your scissors - DON'T SNIP THROUGH YOUR STITCHING


Then fold the bag bottom in half the other way and snip so you make an "X" opening.
At this point it is good to add a little seam sealant to the clipped edges.
This is the lining side of my duffle bag bottom.
Insert the prongs of your bag feet so the prongs are on the lining side.
You can add a drop of fabric glue (this one is my favorite)
The prongs will not show on the lining side because your acrylic support will cover them.

Here's a video to give you a closer look at this great pattern:
It's not a quick sew, but I think you will be very pleased with the results
if you give this pattern a try.

Thanks for reading my blog, I appreciate all my readers so very much.