Tuesday, January 23, 2018

Free Machine Embroidery Download - Valentine Coasters

If you are looking for a sweet, quick, and FREE Valentine accent for your home,
or for a gift, head on over to Creative Machine Embroidery Magazine
Do hurry, though.
The free download expires February 28, 2018.
The instructions are in the January/February 2018 issue.
The design will fit in a 5 x 7 hoop,
but I wanted to stitch out two coasters at a time,
so I chose to use the 8 x 8 hoop on my Baby Lock Alliance.
I used embroidery software to copy and paste a second coaster.
As you can see in the above photo, I did have to turn each design
slightly to fit both of them inside the hoop.
Because I pretty much "squished" two coasters into this hoop,
I cut the batting and main fabric piece at 5 x 7 inches,
which is smaller than indicated in the instructions;
but they still covered the placement line.
Once the front of the heart is stitched out,
two 4 x 7 inch fabric pieces are placed face down on top of
the stitched out heart (I used low tack tape to hold them in place).
The outline of the heart will then stitch them in place,
you will remove the entire design from the hoop,
trim around the heart, and turn it right side out.
The instructions suggest using pinking shears
to trim around the heart, and I highly recommend doing just that.
They add the perfect 'clip' marks so your heart turns easily with nice, smooth edges.

There is one misprint in the instructions:
The third bullet point under PREPARE on page 21 of the magazine
instructs you to fold the short edge of one 4 x 7 rectangle toward the wrong side -
in actuality, you should fold the long (7") edge of the 4 x 7 rectangle
toward the wrong side and press.
I recommend using a press cloth over the embroidery.
Some embroidery threads could melt or discolor under direct contact with the iron.

A beautiful stemmed glass (purchased for $4.50 at a local vintage shop)
and a lovely Valentine coaster make my morning cranberry juice that much sweeter!

With much l💙ve, thank you for reading my blog.


Monday, January 8, 2018

"Un-Beweavable" Ruffled Scarf

If you are a serger owner, I would like to recommend the book:
Serger Essentials by Gail Patrice Yellen.
This book includes advice on threading, tension, differential feed, and needles
relevant to all models.
It also give tips for using decorative threads and techniques
 - and -
it includes instructions for 5 simple projects
This lightweight knit scarf is one of those 5 projects.
It is also the project for my February 28 Baby Lock Serger Class
at both Wimmer's locations:  Layton and Ogden
I had this very, very (almost sheer) lightweight spandex knit on hand,
so I decided to give it a try.
The instructions call for t-shirt weight knit fabric.
I'm actually quite pleased with the scarf.


The edges are finished with a rolled hem
and serger chains are woven into the slits that are cut into the scarf,
using a skip cut rotary cutter blade.

Then beads are tied onto the ends of the serger chains.

If you are in the local area, head to Wimmer's and sign up for the class.
I would be pleased to meet you in person.

Thank you for visiting.


Saturday, January 6, 2018

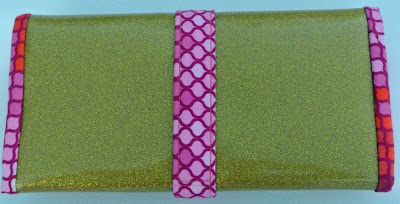
Glo and Go Cosmetic Wrap

Hello sewers and hello 2018!
With the start of each new year, I find myself in organization mode.
This Glo and Go cosmetic wrap from patterns By Annie
is your go to makeup brush and supply organizer.

The pattern instructions call for quilting cotton for the exterior of the wrap,
but I chose to use marine glitter vinyl.
The marine vinyl is easy to sew and easy to wipe clean.
I purchased mine from Pile O Fabric
If you decide to use the marine vinyl for your exterior,
you can omit the interfacing that is called for in the pattern instructions.
The vinyl is more than stable enough on its own.
This wrap is for my daughter, so I machine embroidered her monogram to the font of the wrap.
Before doing so, I searched and searched for blog posts, you tube videos, etc. that might
give me some helpful tips on embroidering on marine vinyl.
I came up empty, as everything I found focused on vinyl applique.
I plan to record a video on said topic, so check my YouTube channel in the near future.

I used my Baby Lock Alliance and I experimented . . .
and it wasn't pretty!
The above photo was the first font I chose for my monogram.
Such a pretty font - not such a pretty stitch out.
I hooped Inspira light cut away stabilizer and placed the vinyl on top.
Do not hoop your vinyl - it is too thick for the hoop and the hoop would leave marks on the vinyl.
The stitches were embedding down into the vinyl, so I added wash away stabilizer
on top of the vinyl (you can see a remnant of the wash away on the second stitch out).
But it still wasn't a pretty monogram.
Soooooo . . .
I changed the font, used the Inspira light cut away stabilizer,
and used wash away stabilizer on top.
Look at that!
The font was the culprit!
The original font was just too delicate.
It got lost in the loft of the glitter vinyl.
The inside of the wrap features mesh pockets to house your brushes and supplies
and a clear vinyl flap to protect your supplies and to keep your wrap clean from makeup
that might be on your brushes.
The top edge of the mesh fabric is finished off with fold over elastic.
Here's a video on how I attach the fold over elastic to the mesh fabric:


The interior (lining) fabric, which is quilting cotton, is coated with Slicker iron-on vinyl.

This pattern can be customized in so many ways.
You can vary the number, the type, and the size of mesh pockets.
Have fun sewing your version to meet your needs.
If you don't want to sew your own, or if you don't sew,
please send me a message,
and I would be glad to sew a custom version just for you.

Okay, back to organizing and de-cluttering my house!

Thank you for stopping by, my friends.
Here's to an organized New Year!!!